Posts Tagged With: irish magazine

Junk Bows – Andrea Ockey Parr

Hi everyone,

Today Andrea Ockey Parr, our fabulous DT member is going to show all our readers how to create beautiful bows from some ribbons that we all have lying around.

Andrea says:

“If your craft stash is anything like mine, you probably have a tangled pile of random ribbon, yarn and lace, not to mention a few hundred half-used ribbon spools lying around!  I buy these with a specific project in mind, but after I use a bit here and there, I never know quite what to do with the rest of it and it can really stack up if I’m not careful.”

Junk bow 1

The solution?  Junk bows!  Junk bows are created from all of those leftover strands and strings that have been lying around in our craft stash for too long.  Junk bows are unique and a snap to make, but best of all, they’re a great way to give your leftovers a wonderful new purpose.

Start your junk bow by cutting pieces of similar-length strips of coordinating ribbon, yarn and/or lace.  You can cut them straight on the ends, or angled, or even fish-tailed like I’ve done with the piece of bird ribbon.

Junk bow 2

Start with the widest strip of ribbon on the bottom, then layer the other strips on top going from widest to most narrow.  Don’t worry if your edges don’t line up or if your middle strips are longer than your base strip.  They are supposed to look sort of unplanned and “junky.”  Do remember to keep one strip aside, however, to tie the bow together in the center.

Junk bow 3

Use the narrow strip you set aside and tie it around the center of your ribbons to form the bow.

Junk bow 4

Once your junk bow is finished, you can attach it to all sorts of things!  Since you can make junk bows in any size and in any color, they’re great for hair accessories, scrapbook or card embellishments and for gift-wrapping.  You can attach them to a rosette base, like I’ve done, for another fresh look.

Junk bow 5

Junk bows can be made from any scraps, even if the ribbons or lace don’t seem to “go” together.  The point of them is that they’re made from strays and spares and leftovers.  Go crazy with the scraps and remember that even though these are called “junk bows,” there’s really no such thing as junk to a crafter!

Junk bow 6

What a great idea!! If you would like to see more of Andrea’s creation, visit her blog.

Happy Crafting,

Crafting Ireland Team
Categories: craft | Tags: , , , , , , , , , ,

DT Call Reminder!

dtcall

Categories: Information | Tags: , , , , , , , , ,

Christmas Card – Eve Louw

Hi everyone,

Today Eve is going to show us Christmas Card with a difference.

Eve says:

“I like so many of us have family that live far away and that I don’t see often, so I thought what a great way to send them a Christmas card but with some photos of what we have been doing this year and the best part is it only takes about 10 min and uses only 1 12”x12” pattern paper.

What you will need:

1 12×12 Pattern paper

(2) 6×4 Chipboard (I sometimes use cerial boxes)

Photos

Embelshments (I did not use any as I want it to stay flat to fit in an envelope to post out)

Step 1

I’m going to use 6”x4” photos so cut your chipboard to (2) 6”x4” and Cut your pattern paper to so you have (2) 6.5”x4.5”.

Step 2

If you don’t mind the chipboard on the sides you can cut your pattern paper the exact size as your chipboard, if you are like me and dont like the look of it, you have to cut your pattern paper a bit bigger, I would suggest about 0.5” to make sure it covers it and goes around nicely.

Just remember that your pattern paper is 12” so if you are making a card that is 6”x4” and you need the extra 0.5” use the border strip that the paper companies use to print the papers name.

Cut your corners to give it a snooth edge.

 Step 3

Cover both pieces of chipboard.

Step 4

Take a piece of pattern paper that u have left from the 12”x12” that use used for the Cover and Back.

Score  on every 0.5” and fold like a concertina.

4

Step5

Attach the ‘spine’ to your front and back pieces of chipboard


5

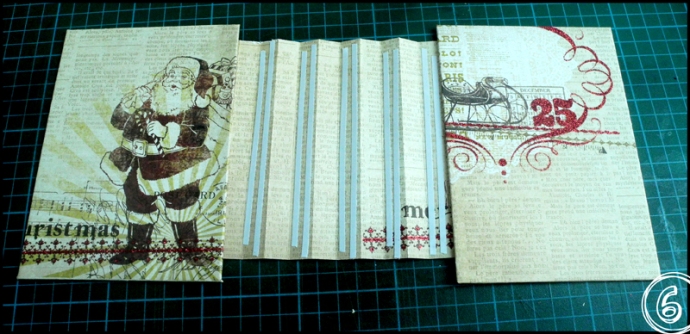
Step 6

Place glue (I used double sided tape) on ever ‘other’ 0.5’ fold.

6

Step 7

Glue them together, creating a contertina effect.

7

Step 8

All you have to do now is glue your images in, take one image and glue it to the first flap, then take your next image and glue it to the back of your first image.


8

Step 9

I used my favourite images for the back of the front and back cover.

9


We hope you liked this fantastic idea.

Happy Crafting,

Crafting Ireland Team

Categories: craft | Tags: , , , , , , , , ,

Design Team Call

Did you see we are having a Design Team Call? All our details are below….

dtcall

We look forward to seeing all your fabulous entries!

Categories: Information | Tags: , , , , , , ,

Autumn Layout – Mary Jo Rhoda

Hi everyone,

Today we are going to show you an Autumn layout project created by Mary Jo, our DT member.

Mary Jo says:

“I have always loved the way the autumn leaves change colors. It is one of my favorite times of year, and one of the reasons my husband and I chose to be married in the fall.

For our fourteenth wedding anniversary, we celebrated with a small getaway up to Canada. We were both blown away by the beautiful scenery up where we were staying.

For this layout of photos from that trip, I wanted to represent the colors and feeling of Autumn and the Indian Summer line by Basic Grey did the trick for me. ”

What you will need:

  •  Cardstock for your background (kraft or neutral color)
  •  Patterned Paper
  •  Alphabet stickers
  •  A variety of fall themed embellishments and stickers
  •  Tags
  •  Mist

Step 1

 Cut a block of solid or light patterned paper for a large photo mat. Layer photos side by side with just a little overlap.

Step 2

 Place border sticker down the left hand side. Also place scalloped patterned paper strip at the bottom of photo mat. Place alphabet stickers along the top. Add two leafy border stickers to frame photos and a leaf sticker next to part of the title.

Extra note: In the finished layout, you will see that I changed the “love” stickers to match the letter stickers for the word “in”. I also removed the circle sticker. I wasn’t happy with either after I had taken the photo and started placing embellishments.

Step 3

I misted two tags using a leafy border sticker and Tattered Angels glimmer mist. In the end, I only ended up using one of the tags for my journaling. Make sure to let your tags dry before working with them!

Step 4

After printing up my journaling on a piece of paper, I attached my tag exactly where I wanted my words to go. I then ran my paper with tag through the printer again.

Step 5

Now the fun part of embellishing! I used two leaf border stickers to frame my photos. The wood veneer people are resting on a leaf sticker. Under one of the photos, I have a fall themed sticker and strip of wood grain washi tape. And then for design purposes, a visual triangle of three clusters using buttons, foam leaves and stickers.


We hope you like this fantastic layout.

Happy Crafting,

Crafting Ireland Team


Categories: craft | Tags: , , , , , , , , , ,

Wedding Card – Aki Iinuma

Hi everybody,

Today Aki (Aki loves kawaii things) is going to show us how to create a beautiful wedding card.

Aki says:

I love making cards when I have small, short, scrappy leftovers of trims or paper pieces.

In this project I would like to show you how to make a simple (but thick) card, as well as the way to use washi tape instead of small paper pieces.

What you will need:

  • Cardstock
  • Patterned Paper
  • Tissue paper
  • Pom-pom trim
  • Washi tape
  • Paper doily
  • Ticket
  • Rub-on (or alphabet stickers) for title

Step 1

Cut out a small piece of patterned paper.

Step 2

Tuck the tissue paper randomly to make pleats.

Step 3

Rub the title on the patterned paper.

Step 4

Put washi tape on the paper.  Glue the paper doily and cut off the excess.


Step 5

Machine-stitch the tissue paper along with the pom-pom trim.  If you don’t have a sewing machine it would be nice to use glue or staples instead.


Step 6

Add some more washi tape. Making layers of washi tape is an easy way to make your projects look fun.


Step 7

Glue a ticket and the small paper piece you made in the step 1.  I used pop-up dots to let these pieces hover.  Glue the entire paper to cardstock, and it’s done!

We hope you enjoyed this tutorial on how to create a beautiful wedding card.

Happy Crafting,

Crafting Ireland Team

Categories: craft | Tags: , , , , , , , , ,

Swap Reminder and a little inspiration

Hi everyone, just a quick reminder from us about the next swap….

For the swap you will be assigned a partner and a theme to follow. You then create a mini album to send to your partner, and you will receive one in return.

Issue 11 Swap Theme—Mini Tag Book

  • Create a mini book from large shipping tags. You can bind it as you wish, with a single binding ring through the tag hole or be more creative if you prefer!
  • Sign up deadline—Sunday the 15th July by 1pm GMT. You must have emailed Felicia your details by this date and time to be included in the swap
  • Swap partners announced—Monday the 16th July. You will be told who your swap partner is, and given their email address so that you can get in contact to exchange postal addresses, style preference, etc
  • Albums must be in the post by— Monday the 13th August (or sooner). Try to get the album posted as soon as you can so that your partner can hopefully receive it before the next swap is announced!
This time we have a little inspiration for you. I created this tag mini album cutting the tags from patterned paper. My title is ’10 things I love about summer’. I simply decorated the tags with elements from the paper collection. For the binding I used Tim Holtz Swivel Clasp. I also added some charms in summer theme.

This album is only an idea I had, I am sure you can create  a beautiful tag album for your partner, possibilities are endless.

The rules for the swap:

  • The album should be no bigger than 6″x6″
  • It should have at least 6 pages including the front and back covers.
  • Please remember that your swap partner (probably) doesn’t know you and the work you send will be their first impression of you – so make sure that you are proud of your work and would be happy to receive something similar.
  • Please do not sign up for this swap unless you can complete the swap, your partner may be overseas and you are responsible for postage fees.
  • You must have an email address to enter – this means you can contact your swap partner to discuss favourite colours etc.
  • Sometimes people send extra goodies with an album, this is a      lovely gesture but NOT compulsory, therefore it is up to you. Please do not expect to receive extras!
  • The last and most important rule is…. Enjoy creating!!

To join the swap you will need to email your details to Felicia at:
felicia@craftingirelandonline.ie

When you have finished your album consider taking a photo of it before posting it, and email this photo to Felicia. We will then publish these photos along side the next swap announcement. We will publish them without names just in case your partner has not yet received your album—we wouldn’t want to ruin the surprise!!

I hope you like our inspration and will want to join in the swap,

Happy Crafting,

Crafting Ireland Team

Categories: craft | Tags: , , , , , , , , ,

Online Class!! Mini Scrapbook Layouts

We are hosting a free online class on the 21st July at 3pm BST. In the class we will create some mini scrapbook layouts. These layouts are perfect for card makers who want to get into scrapbooking or for scrapbookers who find they are running out of space for bigger layouts! We will also make a desktop flip display stand for the pages so you can show them off where ever you like!

Supply list for the online class
Mini layout pages:
*4 sheets of cardboard/chipboard at 13cmx13cm ( 5 1/8 ” x 5 1/8″ )
*10 sheets 6×6 paper cut down to 13x13cm ( 5 1/8 ” x 5 1/8″ )- keep the off cuts!
*This will make 4 double sided pages so you will have 8 pages in total, you can of course make more if you wish!
* Polaroid style photo mats: photos are 7.4 x 7.4 cm ( 2 7/8″ x 2 7/8″ ) and the white card to matt them on is 9.6cm x 8.1cm (3 3/4″ x3 3/16″)
*You will need 8 photos and 8 photo mats
*Adhesives, border punches, trim, score board, duct tape and tools as usual
*Binding rings or ribbon (Binding rings do work the best)
*Crop a dile/eyelet setter and eyelets (optional)
*Hole punch
For the stand:
*1 x Sheet of chipboard 30cm long and 15cm high (12″ x 6″)
*2 x pieces of chipboard 15cm high and 6cm wide (6″ x 2 3/8″ )
*Duct tape
*Paper or paint to cover it
*Optional – embellishments. I use tissue tape.

To find out about the starting time in your timezone visit: http://www.timeanddate.com/worldclock/converter.html

It will be a fun project to do, so we hope you join us on 21st July,

Happy crafting,

Crafting Ireland Team

Categories: Information | Tags: , , , , , , ,

Introducing Eva Birdthistle

Hi Everyone,

Thank you for visiting our blog today.  I am so excited to introduce another fantastic crafter, Eva Birdthistle to you today.

Eva lives in Limerick, Ireland with her family.

Eva began crafting in 2004, she enjoys doing cards, layouts and altered items as well. Eva loves photography and she runs her own business that works with creative industries.

Eva recently started Scrapbooking Limerick which is a monthly class for all papercrafts fans.

Her style is absolutely fabulous and insprational.


I hope you enjoyed looking through some of Eva’s beautiful work. For more great projects and tips on photography visit Eva’s blog.

We are thrilled that Eva accepted our invitation to the Design Team. I am sure she will amaze us with her fantastic projects in the magazine.

Tomorrow we will be introducing another crafter from Ireland 🙂

Happy Creating,

Crafting Ireland Team

Categories: Uncategorized | Tags: , , , , , , ,

Introducing Aki Iinuma

Hi everyone,

Thank your for visiting our blog today. We are going to introduce another  fantastic crafter on our Design Team: Aki Iinuma.

Aki is from Tokyo, Japan and we are so thrilled that she accepted our invitation to the team.

Aki has been  a crafty soul since she was a child. She started scrapbooking about three years ago and now she is totally addicted.

Aki really likes to work with soft colours. She describes her own style as simple but messy. Aki designs for Sketchabilities and Sketches With a Twist too. Aki is a real talent, her creations are so well designed and detailed.

Let’s have a look at some of Aki’s beautiful work:

You can see more of her work on her blog Aki loves kawaii things

I hope you enjoyed today’s introduction, tomorrow we will be back with another member of Crafting Ireland Design Team.

We would like to thank Aki as we know she is going to inspire us for the next five issues of Crafting Ireland, we can’t wait to see her projects!

Also we would like to say a big thank you to all our blog readers.

Happy Crafting,

Crafting Ireland Team

Categories: Uncategorized | Tags: , , , , , , , , ,