
Posts Tagged With: guest post
Halloween Card & Treat Bag

Guest Post with Sandie Dunne – Waltzingmouse Stamps
Hi all, we have another gorgeous guest post for you today, from Sandie Dunne of Waltzingmouse Stamps. She is here to show us how she created a fun beach scene using the My Island stamp set.
Guest Post with Sandie Dunne – Waltzingmouse Stamps
Hi all, we have another gorgeous guest post for you today, from Sandie Dunne of Waltzingmouse Stamps. She is here to share the process of creating a beautiful layered card. Working with layers can be intimidating to some, so check this out!!
Guest Post – Waltzingmouse Stamps
Hi all, we have another gorgeous guest post for you today, from Sandie Dunne of Waltzingmouse Stamps. She is here to share a clever project idea with us.
Guest Post – Waltzingmouse Stamps
Hi all, we have another gorgeous guest post for you today, from Sandie Dunne of Waltzingmouse Stamps. She is here to share a gorgeous spring scene card with us.
Giveaway!!
Oh and big hint….make sure to read all the way to the end to see the fabulous GIVEAWAY hidden in this post!!
Giveaway!!
* Hop over to the Waltzingmouse Stamps Blog and leave a comment on the tutorial post.
Guest post: Spring Super-Star
Hi all,
Today we have another guest post from Kajsa Kinsella from The Northern Shores. Kajsa is from Sweden originally and is an avid crafter and baker. She has lived in county Wicklow since 2013. She runs her Northern-inspired Bakery and Craft Business from here and also teaches various crafts to adults and children.
Kajsa is going to show us a lovely tutorial today on making a Spring Super-Star.
**********************************
What you will need:
- Turquoise Blue, Apple Green, Light Pink and Sun Yellow Card Stock
- Matching Patterned Paper – I used The Country Diary of an Edwardian Lady” by Rowena Stott
- White Card Stock
- Regular Scissors & patterned craft scissors
- Ink pads
- Spring inspired Stamps
- Matching Gems
- Glue stick & PVA Glue
- Tweezers, Thin Paint Brush and Hole Punch
- Ribbon
Step 1
There are a good few rectangles used in this project, so keep them in neat separate piles-this gives you have a good overview and can you easily see which one to use next. With a regular scissors or a paper guillotine, cut out eight large rectangles of card-two of each colour, measuring 21cm long by10cm wide. Fold each one in half neatly and press firmly on the fold to make it crisp.
We then cut the medium size rectangles with a patterned craft scissors out of pretty paper-these should measure 18cm long by 8.5cm wide. Fold these as well.
Now cut the smaller size pieces out of the same card stock as before-they should measure 14cm wide and 7.5cm wide and should have straight sides and fold.
Finally, we switch to white card stock and cut out rectangles, again using the craft scissors which measure 10cm by 4.5cm. Fold the same way again.
Step 2
Open up one rectangle each of the three coloured sizes and glue them together as you can see in the picture-But-ONLY glue the top parts together-not the entire square or you won`t be able to open up your star later. Keep going and make eight of those one-sided star pieces, then leave them aside to dry for a while.
Now we come to the fun part-Beautifying! Take the smallest white rectangles, choose some cheery, spring-inspired stamps and go to town in decorating them. I have listed the ones I used and I stamped with green, yellow, turquoise and pink ink. Attach one side of the rectangle to the layer of three and let dry.
Step 4
Find some matching small gems, hold them with a tweezers, dab on some PVA glue with the paintbrush and place them on the stamped images. It`s gorgeous!
Step 5
Then we’ll glue the other side closed-don`t be tempted to glue both sides at the same time-the parts will slide apart and glue that isn’t where it’s supposed to be, is indeed very messy! Complete all eight and leave to dry.
Step 6
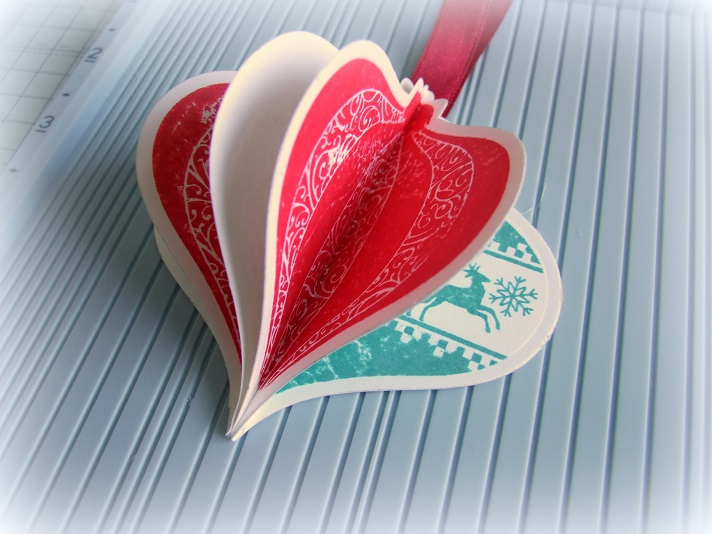
Here comes the assembly part-check the eight star parts and make sure all sides are straight and neat-the care you take now to make sure all is aligned will certainly pay off later. So, now we glue the parts together back to back as you can see on the picture. Let dry again thoroughly. Do not glue the first and the last side together.
Step 7
Complete your star by holding the first and the last side together-isn`t it amazing! Punch a single hole through both layers-you might need to take one side at a time-eight layers of card might be a little tough to pierce in one go!
Step 8
Cut a piece of a cheerful ribbon, fold in half and push through both holes. Make a loop, tie the ends together and hang it up where the sun shines on it. So simple and yet so beautiful!
**********************************
We hope you enjoyed this fun tutorial from Kajsa. It’s a beautiful spring time project but is very versatile as it could be changed to suit any season or event!
Happy Crafting,
The Crafting Ireland Team
Guest Post: Padded Valentines Heart
Hi all,
Today we have a guest post from Kajsa Kinsella from The Northern Shores. Kajsa is from Sweden originally and is an avid crafter and baker. She has lived in county Wicklow since 2013. She runs her Northern-inspired Bakery and Craft Business from here and also teaches various crafts to adults and children.
Kajsa is going to show us a lovely tutorial today on making a beautiful padded heart.
**********************************
What you will need:
- Blue and Pink Card Stock
- Pretty Paper – I used Vintage Rose Collection by Pink Petticoat
- Small Paper Doilies
- Vintage Angel Scrap embellishments
- Pink and Blue Ink Pads, Pink
- Gingham Ribbon
- Shiny Flower Gems
- Sewing Machine & white Sewing thread
- Glue Stick
- Toy Stuffing – I got this from ebay
Step 1
Use the large heart from the template below and cut out two hearts with a pinking shears.
Step 2
Cut out two hearts with the help of the smaller template in pretty floral paper. Use a craft scissors for these. Glue one each to the centre of a larger heart.
Step 3
Load your sewing machine with white thread and lay the two hearts back to back. When you sew them together, make sure they don`t slide apart. Place the ribbons on top of each other-blue ribbon facing the pink side and pink ribbon facing the blue and wedge them in at the top of the heart between the layers. Sew in place and keep sewing but remember to leave a gap for the stuffing. Use the back of a pen or a wooden ladle to gently push the stuffing into the heart-don`t over stuff it, or the seams will separate. Sew the heart shut and trim off any loose ends.
Step 4
Dab the edges of the little doilies with pink and blue ink respectively. Cut out the Cherub images and glue one to the centre of each doily. Decorate around the edges with green flower gems for the pink and clear gems for the blue.
Step 5
Dab a little glue to the back of each doily and attach it to the centre of the heart- pink to pink and blue to blue.
Step 6
Tie a knot high up on the ribbon and loop a pretty bow.
There we go-a loving Valentines gift or decoration for the boy or girl of your choice!
**********************************
We hope you enjoyed this lovely tutorial from Kajsa today!
Happy crafting,
The Crafting Ireland Team
Guest Post: Valentines Card by Waltzingmouse Stamps
Guest Post: Christmas Cards
Hi All,
Today we have a guest post from Katie Brett of Chantilly Rose Crafts. She has created a fantastic tutorial to show us how to make some gorgeous, quick and easy cards. These would be perfect for those last minute cards needed!
What you will need:
- Card base
- Stamps
- Patterned acetate (or stamp and create a pattern on some plain acetate)
- Adhesive
- Washi tape
- Pearls
Step 1
Cut a piece of snowy acetate the same size as your Kraft card blank, to act as a slip cover.
Step 2
Step 3
Your card should now look something like this.
Step 4
Cut a ‘banner’ shape from white card, and stamp a sentiment. I used a sentiment from the Mulberry Wood range, from Crafter’s Companion.
Guest Post: Waltzingmouse Stamps Holiday Ornaments
We have an exciting guest tutorial on the blog today from Waltzingmouse Stamps! If you have come across Waltzingmouse Stamps (WMS) before you don’t need me to tell you how stunning their stamps are. Personally I have lots of their sets and they are definitely my go to sets, especially their amazing sentiment sets!
Today we have Sandie Dunne from the WMS Design Team with a fantastic tutorial on how to create these gorgeous holiday ornaments.