craft

Happy Halloween!

Hi all and Happy Halloween! This is the last post from us here on the blog so one last time thank you all so much for your readership over the years, we appreciate every step of this journey you have taken with us. Have a great Halloween and above all happy crafting!!

happy halloween


Signing off for the final time,

The Crafting Ireland Team – Nicole and Timi

PS: We will miss you guys!!

Categories: craft | Tags:

Design Team Good Bye!

Hi all!

You know we love doing recaps on what our team has been up to and showing off their super talents. Since this is the last time we get to do so we decided to do it a little bit differently. We asked the team to pick one project that was their favorite out of all the projects they worked on in their time on the team. It is a big ask to limit it down to one project but some of our team gave it a shot and some we had to pick for them! So here it is, our final design team shout out….

Aideen – www.piecesbyaideen.com

YouTube channel

Aideen has such a fun style and personality, she is quirky and unique and loves a creative project. What could be more creative than turning an Impala head into a beautiful piece of art? She feels the piece she loved working on the most was turning this from this…

project 1

To this…..

project 8

We love the unexpectedness of this piece, it is so fun yet classy! You can see the complete tutorial for it HERE. Thank you Aideen, your projects have been amazing and we have loved working with you!

Abby – scrappin-abby.blogspot.ie

Youtube channel

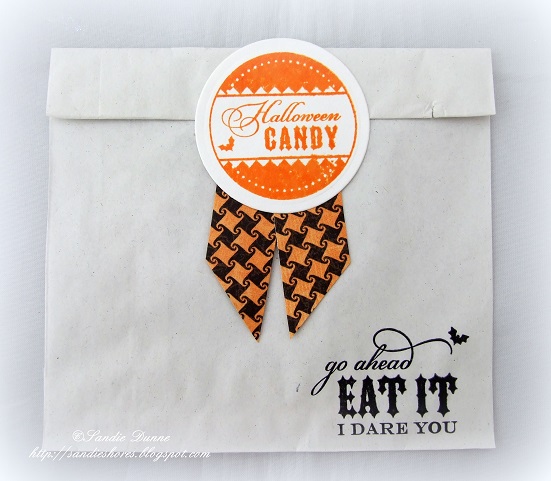
Abby always has gorgeous creations on her blog and these is in big demand on design teams. She has a gorgeous shabby chic style and we love her love for the colour purple! One of our favorite projects from Abby was this stunning muslin gift bags. It was such a simple yet stunning way to present a gift card to someone! You can see the full creative process for this bag HERE. Thank you Abby, we love your creative works!

Final Pic 1


Andrea – sapimano.blogspot.hu

Tutorial inspiration pages here.

Andrea is on the Sizzix Blog design team and she has such a fantastic eye for colour and detail. We love her style and how she uses those dies! This mixed media layers layout really showcases her eye for colour and pattern and it is one of our favorite creations of hers. You can see how she created it HERE. Thank you Andrea, your colour use has been inspiring!

DSCF5016

Katya – madewithlovebykatya.blogspot.ie

Facebook page here.

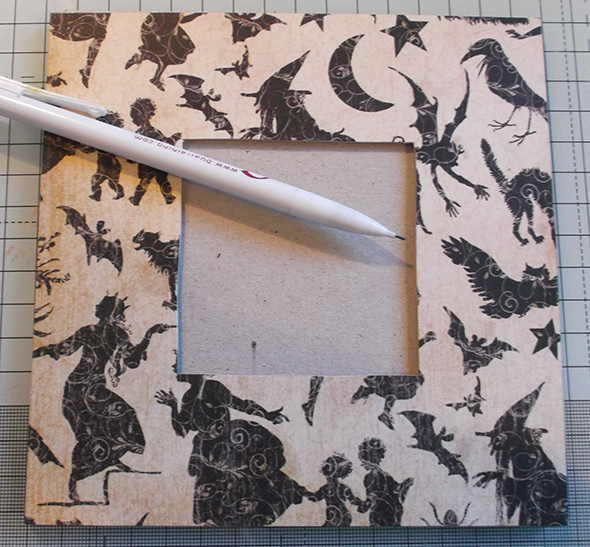
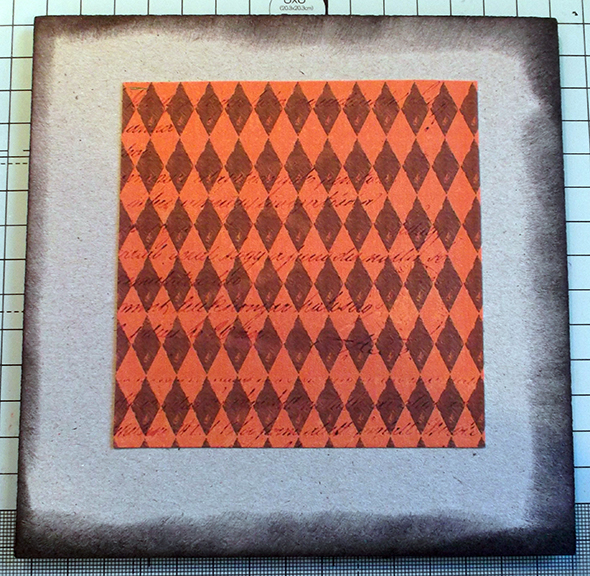
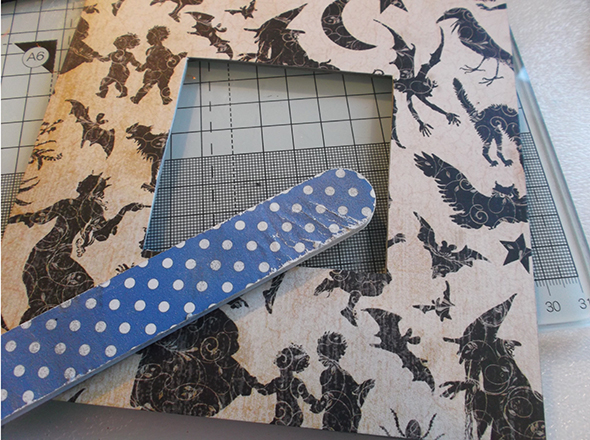
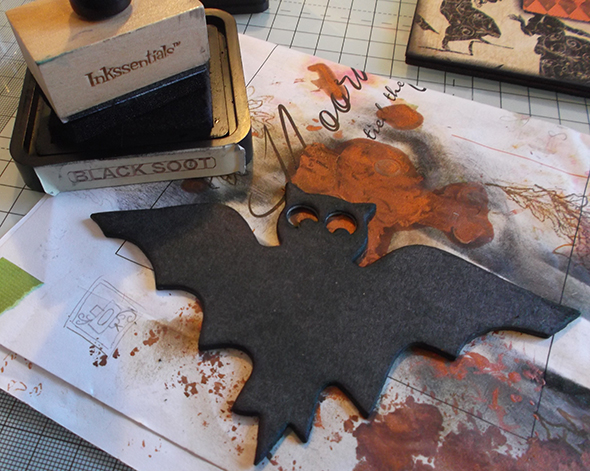
Katya has a beautiful way of mixing colours, patterns and papers into wonderful creations. She really takes papers and brings out the best in them and creates beautiful and unique things with them! This super adorable envelope mini album is a lovely example of her work, it is such a cute and whimsical creation. You can see how she created this HERE. Thank you for all your projects Katya, you have been inspiring!

5

We hope you enjoyed this look at what the team enjoyed working on the most while here. We are sure that you will agree they are super talented ladies and we wish them all the best in all their future crafting endeavors. Thank you all ladies, it has been so fun!!

Happy Crafting,

The Crafting Ireland Team.

Categories: craft | Tags: ,

Thanksgiving card & Halloween Decor – Aideen Fallon

Hi everyone,

Today we have a big treat for you – Aideen is going to share a super cute Thanksgiving paper piecing project with you all with a video….AND you get a bonus Halloween decor video too! Take it away Aideen…..

Project 1 – Thanksgiving

Hi guys,

Today I have a super easy peasy project that looks really cute when you have it all done up!

photo 1 (21)

It’s paper piecing which you may or may not have tried before-such a great way to use up your scraps of papers and create a card set for any occasion which is handy to have on hand.photo 2 (20)

I have a video sharing all the details so please take a peep HERE or watch below.

Project 2 – Halloween

I have a fun Halloween decoration to share today and also a video to show how I put it together!!

The stamp I used is by Julie Nutting and is perfect for my rosette decoration. The other decorative pieces are all just from my stash.

 You can see how I created these HERE or watch below.

Thanks for reading and watching,

Aideen x

Categories: craft | Tags: , , ,

End of an era!

Hi all,

It is with great sadness we are blogging today to tell you all that as of the end of this month we will not be continuing the Crafting Ireland blog.

You may know that we had discontinued the magazine format at the start of the year as it was taking too much time and cost for something we run as a fun hobby. We had hoped that by reducing the amount of workload we would be able to keep going for longer. But unfortunately we have had to make the difficult decision to wrap up the blog. For both Timi and myself life has just gotten too hectic with work, family and other stuff going on – you all know how it is. So rather than decrease on the quality on the blog and produce something we are not happy with, we have decided to wrap it all up.

We are very sad to see it come to this stage, we will miss working with our amazing design team on the blog posts every month, and seeing creations inspired by their work. We could not have gotten this far without them so from the bottom of our hearts we want to say a huge thank you to our design team members (both past and present) that made Crafting Ireland a reality. You ladies are all so talented and we know we will keep seeing you in the crafting world!!

As for our readers- we would not have come this far without you guys. Your constant readership and support are what have kept us going for so long. We intend to leave the blog, the Pinterest and the website up as archives of all the tutorials produced over the two years we have been working on this. You will be able to view all the content and see instructions on any projects you choose. In a few weeks we will turn off commenting however just so we don’t keep getting notifications to admin them.

We have a few posts lined up over the next few days to wrap up the month with so we will say good bye properly before the end of the month. But for now thank you all for being so amazing,

Happy crafting,

Nicole & Timi

Categories: craft | Tags: ,

Halloween Wall Hanging – Nicole

Hi all, Nicole here with a fun Halloween wall hanging with you all. I used the super fun and handy diecut frame from Crafty Cutting.

Step 1

I covered the frame with some fabulous Halloween papers. I traced the frame onto the paper to get the size and cut it out, including cutting out the middle of the frame.

pic 1 pic 2 Step 2

I cut a piece of paper to fit inside the opening of the frame. I used this fun harlequin pattern in black and orange.pic 3 Step 3

I sanded off the edges of the paper to get a smooth edge on the paper and then inked up the edges with black soot distress ink.pic 4 Step 4

I inked up a bat from the crafty catting range and then inked over it in black embossing powder to give a lovely shine.pic 5 pic 6 Step 5

I added some twine in between the two pieces to have something to hang the frame by.pic 7 Step 6

I added some glow in the dark paint on some parts of the paper. This dries clear but gives a cool glow when its dark!pic 8I glued the bat on the frame and called it done! I love the 3d effect and dimension these frames give without being too bulky!
pic 9


Thanks for stopping by today and hope you enjoyed this project!

Categories: craft | Tags: , , ,

Halloween Card & Treat Bag

Hi all, we have another treat from Waltzingmouse Stamps DT member Sandie Dunne. She has created this really fantastic Halloween Card and Treat Bag…. enjoy!!
WMS Logo
Hi! It’s Sandie here and today I am sharing a Halloween Card and Treat Bag set I made featuring  Waltzingmouse Stamps Boo and Friends & Peek a Boo Sentiments
The card measures 4.25″ x 5.5″ and the papers I’ve used are ‘Enchanted’ by Authentique. I’ve matted them with black and orange cardstock. I cut the spiderweb circle with nestabilities and mounted my ghost on 3D foam. I added some Spiderweb corners and some Eerie bats to embellish.
Copics markers used – C3, D5,C7, C9
The treat bag is simply a cellophane bag cut down to size. I used the same patterned papers as on the card. I cut a strip of stripey paper about 2″ deep, folded it in half, slipped it over the top of the bag and stapled it closed. Then I used nestabilities scalloped circles and classic circles for the sentiment. I adhered the sentiment, from Peek-a-Boo Sentiments with 3D foam and added a bat to tie it in with the card.
Waltzingmouse Stamps products used – 
Other products used –
Authentique “Enchanted” 6×6 paper pad
Sandie
xXx
Categories: craft | Tags: , , , , ,

Book Review: The Irish Countrywomen’s Association Book of Craft

We recently got a review copy of the The Irish Countrywomen’s Association Book of Crafts. The book is a beautiful piece of work and contains 40 projects that you can work on at home. They range from simple beginner level to more advanced.  The instructions are perfect and very easy to follow. The images in the book are perfect also. You get a beautiful inspiration image and then lovely step by step photos for along the way.

pic 1 The book is broken into four sections; Stitch and Show, Make and Wear, Store and Keep and Celebrate. This is a great range of categories with something for everyone in each section.pic 2 The projects are beautiful and modern twists on techniques. I love this card made using the Iris folding technique. I found the instructions really easy to follow and made my own project very happily!pic 3 There are so many things in the book I want to try, I will be working through this for quite some time!pic 4


The Irish Countrywomen’s Association was founded in 1910, and celebrated its centenary in 2010. With over 11,000 members, 27 Federations (or County Committees) and 553 Guilds around the country, the ICA has played a pivotal role in supporting Irish craft and keeping traditional skills alive.

This book is a beautiful example of the wonderful works they do!

‘The Irish Countrywomen’s Association Book of Crafts: 40 projects to make at home is published in hardback at €22.99 and is also available in eBook format from all the major outlets.’

Disclaimer: We were sent a free copy of the book to review, but all opinions are purely our own and we have received no compensation for this review.

Categories: craft | Tags: ,

Guest Post with Sandie Dunne – Waltzingmouse Stamps

Hi all, we have another gorgeous guest post for you today, from Sandie Dunne of Waltzingmouse Stamps. She is here to show us how she created .some adorable and fun Halloween treat bags!

WMS Logo

Halloween Treat Bags

Supplies:
White paper bags – 6″ x 5″
Halloween themed patterned papers
Waltzingmouse Stamps Midnight Feast stamp set
Orange & Black ink
Midnight Feast Cut Files or Classic Circle Nestabilies
Stapler
Double sided tapeHow To: 

1. On each bag, in the bottom right hand corner, stamp the ‘Eat It’ sentiment. Set bags aside
2. Taking Peeled Orange Distress Ink stamp the circular sentiments onto white card and cut them out using Classic Circle Nestabilies, or using the coordinating Midnight Feast Cut Files
3. Cut patterned papers into 1″ wide x 3.5″ long strips and scissor cut the bottom at an angle to make pennants. Staple 2 pennants together, at the top, and adhere to the back of the circular sentiment

4. Once you have your candy/treats in the bag, twice fold the top down about 1″. Remove the backing from the double sided tape and adhere the bag closed.
 We love these adorable treat bags that Sandie has made. They would be great for parties or even for giving out at the door – depending on how many visitors you get that is!
Categories: craft | Tags: , , , , ,

Glossy Accents

Hi everyone,

Hi everyone,

It is Timi here and today we are going to show two ideas with Glossy Accents, the adhesive that we all love!! Nicole and I decided to create something that uses glossy accents and here is how we used it on our projects.

Timi – Custom Title

I few weeks ago you saw a layout I made that was called Stop & Stare. Sometimes I want to use a custom title that could be a few word of a song or a catchphrase.

Since I got my Cameo there are no limits in creating titles for my scrapbook pages. This time I mixed a few techniques together.

Step 1

Cut out the title from white cardstock.

??????????

Step 2

Using some Gelatos create watercolour effect on the background of the title.

??????????

Step 3

Glue down the letters to complete the title.

??????????

Step 4

Add Glossy Accents to the white letter to create interest and dimension.


??????????


Nicole – Custom background

I love making custom backgrounds on projects. It allows me to have them perfectly co-ordinated with the rest of my project. It also allows me to have fun creating them and thinking up of new ways. On this tag I used glossy accents to help dress up a strip of grey paper and also decorate a chipboard shape!

Step 1

I added drops of glossy accents to a strip of grey card stock and let it dry.
pic 1 Step 2

I also added glitter to a coloured butterfly and coated this with glossy accents.


pic 2

pic 3 Step 3

When my dots of glue were dry I inked over the card stock with black ink. The glossy accents acts as a resist to the ink and gives a fun pattern.pic 4


I put this all together and made a little tag with it.

glossy accents tag complete


These were the project that we created for this private challenge!

We hope you liked them,

Happy Crafting,

Timi and Nicole

Categories: craft

Autumn Card – Nicole Mullen

Hi all,

Nicole here with you today to share an autumn themed card. I started with a sketch idea I scribbled out on a scrap of paper. It was the rough idea of what I wanted to do…

pic 1

I wanted to use the Nature Garden papers from Prima for this. They are lovely muted autumn colours and perfect for what I needed.pic 2 I cut some paper down to size (with a cream mat for behind it). I then distressed the edges of the paper.pic 3 I die cut a panel for the center and used some distress inks to stamp some leaves on it.pic 4 I then die cut another shape from the Prima papers for on top of this.pic 5 I stamped and cut out one of the leaves individually.I used two colours to stamp, you can slightly see this in the image below.pic 6 I tore a strip of paper to size to fit across my card and wrapped some twine around it.pic 7 My two die cut pieces then got mounted on foam pads on top of this. I added some brads in the holes in the top die cut piece.pic 8 The leaf got mounted into the center of this section.pic 9

I put this all together and mounted it onto a kraft card. I also added some flourishes in behind the panel to add some more colour. I diverged from my sketch a lot at this point and didn’t add in the tag elements I had sketched out. I may keep that idea for another card some time!complete 2 small


The colours and texture all give this card a lovely autumn feel.complete 1 small


I hope you enjoyed this card and get inspired to use some of your craft supplies to create seasonal projects!

Categories: craft | Tags: , , ,