Posts Tagged With: design team

Design Team Good Bye!

Hi all!

You know we love doing recaps on what our team has been up to and showing off their super talents. Since this is the last time we get to do so we decided to do it a little bit differently. We asked the team to pick one project that was their favorite out of all the projects they worked on in their time on the team. It is a big ask to limit it down to one project but some of our team gave it a shot and some we had to pick for them! So here it is, our final design team shout out….

Aideen – www.piecesbyaideen.com

YouTube channel

Aideen has such a fun style and personality, she is quirky and unique and loves a creative project. What could be more creative than turning an Impala head into a beautiful piece of art? She feels the piece she loved working on the most was turning this from this…

project 1

To this…..

project 8

We love the unexpectedness of this piece, it is so fun yet classy! You can see the complete tutorial for it HERE. Thank you Aideen, your projects have been amazing and we have loved working with you!

Abby – scrappin-abby.blogspot.ie

Youtube channel

Abby always has gorgeous creations on her blog and these is in big demand on design teams. She has a gorgeous shabby chic style and we love her love for the colour purple! One of our favorite projects from Abby was this stunning muslin gift bags. It was such a simple yet stunning way to present a gift card to someone! You can see the full creative process for this bag HERE. Thank you Abby, we love your creative works!

Final Pic 1


Andrea – sapimano.blogspot.hu

Tutorial inspiration pages here.

Andrea is on the Sizzix Blog design team and she has such a fantastic eye for colour and detail. We love her style and how she uses those dies! This mixed media layers layout really showcases her eye for colour and pattern and it is one of our favorite creations of hers. You can see how she created it HERE. Thank you Andrea, your colour use has been inspiring!

DSCF5016

Katya – madewithlovebykatya.blogspot.ie

Facebook page here.

Katya has a beautiful way of mixing colours, patterns and papers into wonderful creations. She really takes papers and brings out the best in them and creates beautiful and unique things with them! This super adorable envelope mini album is a lovely example of her work, it is such a cute and whimsical creation. You can see how she created this HERE. Thank you for all your projects Katya, you have been inspiring!

5

We hope you enjoyed this look at what the team enjoyed working on the most while here. We are sure that you will agree they are super talented ladies and we wish them all the best in all their future crafting endeavors. Thank you all ladies, it has been so fun!!

Happy Crafting,

The Crafting Ireland Team.
Categories: craft | Tags: ,

What are our DT up to??

Hi all,

We thought it was about time for another design team recap post. You know we love peeking over at our teams blogs and seeing what they have been creating and sharing with you all!

**********************

Aideen Fallon – www.piecesbyaideen.com

Aideen has some really fun haul photos and videos over on her blog that are a must watch – who doesn’t like lace and flowers! She also had the exciting news of being featured over on the Graphic 45 blog, so exciting!!

**********************

Katya Ivanova – madewithlovebykatya.blogspot.ie

Katya has some stunning creations up over on her blog. She has an adorable Bambi card here that is just the sweetest. She also has an adorable cook book she made as a gift for her nana.

**********************

Abby Henderson – scrappin-abby.blogspot.ie

Abby has an adorable layout with tutorial up here. It is in celebration of her 5th wedding anniversary too! She also has a really cute canvas bag and tutorial here. This was a gift for a friend and it is just beautiful!

**********************

Andrea Kovacs – sapimano.blogspot.hu

And last but by no means least we have Andrea. She has a gorgeous page here from her art journal book – it is really beautiful! There is also a perfect bright and summery mini album from her that you can see all the details on here.

So there you have it, a quick recap on what our amazing team has been up to. Check out their blogs and stop by and leave them a comment if you like their work!

Categories: craft | Tags: ,

Fall Harvest Tag-Abby Henderson

This is fun Fall/Harvest themed tag I created that can be used as a gift tag or you can place it on a 12×12 layout and journal about your Fall photo.

What you will need:

  • Kraft Tag
  • Sprays/Glimmer Mists (colors of your choice)
  • Cardstock-patterned paper
  • Burlap (I used DCWV Burlap Paper)
  • Distress Tool
  • Distress Ink
  • Ribbons/Trims of your choice
  • Fall themed embellishments
  • Flowers
  • Heat tool
  • Embossing Powder
  • Perfect Medium
  • Chipboard Banner Pieces
  • Smooch Gold Paint
  • Adhesive of your choice
  • Muslin-Cheesecloth Fabric (or fabric of your choice)
  • Additional embellishments of your choice

 Step 1

I wanted to add some extra texture and dimension to my chipboard banner pieces so I used some two-toned embossing powder after coating them with some Perfect Medium.

Step 1
Step 2

For the letters, I knew they needed to stand out a bit from the embossed background on the banner pieces so I painted them with the Gold Smooch paint.

Step 2

Step 3

While the letters were drying, I went to work on the tag. I chose to cover the entire tag with some burlap. I used Scor-tape to adhere it to the tag and then cut away the excess with my craft knife. I knew this would give the base of the tag some added texture.

Step 3 Pic 1

Step 3 Pic 2
Step 4

For another texture element, I took some vintage muslin type fabric I had in my stash and sprayed it with some color spray after I distressed the edges with my tool (Insert Step 4 Pic).

Step 4

Step 5

Before I assembled the tag, I wanted to give it another layer of texture and dimension so I used more of my color sprays and dabbed them on the tag using a brush. This way I had more control of where it went which I wouldn’t have had I just sprayed directly from the bottle.

Step 5

This is where creative play comes in, my favorite part. Once all of the letters and elements for the tag were dry, I began layering them on the tag. I used a variety of flowers and feathers to add some extra texture and to really tie in the Fall theme I was going for. This is a fun project to create that you can either attach to a bottle of wine or a hostess gift or you can simply add it to a 12×12 layout, which is what I will be doing with this tag.

Final Pic 1

Final Pic 2

Final Pic 3

Final Pic 4

Categories: craft | Tags: , , ,

Honeycomb Tag – Katya Ivanova

Hi everyone,

Today we are back with another cute tutorial from Katya. She is going to show you how to honeycomb tutorial. This tag could be a great addition to a summer birthday gift.

What you will need:

  • cardstock
  • scrapbooking paper
  • chipboard
  • stamps
  • flowers
  • raffia
  • leaves
  • twine
  • brads
  • eyelet


008
Step 1

Cut out the base of the tag measuring 9 by 16cm. And papers, I cut the papers 5 mm smaller than the base.

step1
Step 2

Distress the edges of the paper using scissor blade or distress tool. Then I covered the edges with Antique Linen distress ink. Then I decided to use up some of my scraps and ripped some papers and layered them up.

step 2

step2
Step 3

Then I attach the chipboard to the tag using a stapler.

step3

Then I make a raffia bouquet, glue in onto the tag.

Katya step 3

Step 4

Then I started layering some flowers and leaves.

Katya step 4

Step 5

I stamped some tiny bee images and cut them out.

Katya-step 5Step 6

The final step is to attach an eyelet. I put some twine through the loop and added some beads.


Katya_step6
This is the final look of the tag.

031

We hope you liked this tutorial.

Happy Crafting,

Crafting Ireland Team

Categories: craft | Tags: , , , ,

Summer Card – Andrea Kovacs

Hi everyone,

Today Andrea, our DT member is going to show you a quick summer card to create.

What you will need:

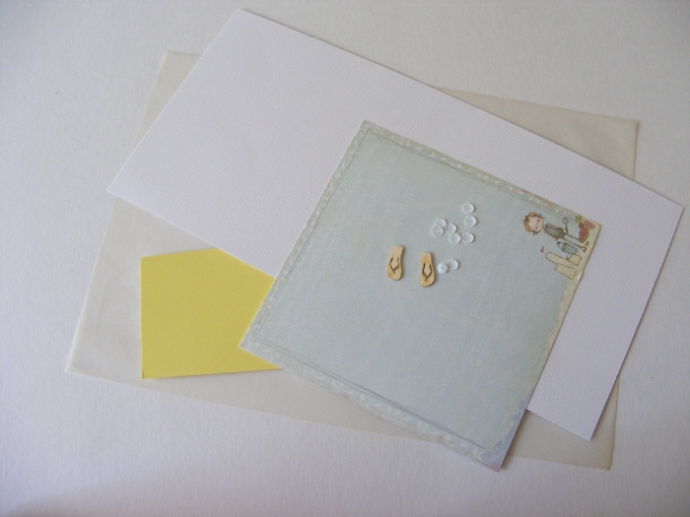
  • White card stock
  • vellum
  • pale blue scrapbook paper
  • summer themed chipboard pieces
  • other embellishments

00


Step 1

Cut a window on the front of the card.

01

02

Step 2

Cut the patterned paper to size.

03


04

Step 3

Die cut a fishing net like background from vellum. If you don’t have an electronic cutting machine, you can use anything that reminds you to fishing net to achieve a beach feel to this card. Cut the vellum to size and attache it to the back of the window on the card.

05

06

07

Step 4

Add the pale blue patterned paper to the inside of the card

08

Step 5

Add sentiment using die cut letters or alpha stickers and add the summer themed embellishments.

And there you have a fantastic summer themed card!!

09

10

We hope you like this tutorial and we inspired you to create something summer themed.

Happy Crafting,

Crafting Ireland Team

Categories: craft | Tags: , , , , ,

Beach Mini Album

Hi everyone,

Today Abby is going to share a great Beach Mini Album that she created. This is what Abby said: ” This is a shabby chic style chipboard mini album that will be perfect to display your family photos from your beach vacation.”


What you will need:

  • Chipboard Mini (mine is a sand bucket)
  • Sprays/Glimmer Mists (colors of your choice)
  • Cardstock-patterned paper
  • Distress Tool
  • Distress Ink
  • Craft Paint
  • Ribbons/Trims of your choice
  • Beach themed embellishments
  • Embossing Folder
  • Glossy & Crackle Accents
  • Heat tool
  • Adhesive of your choice
  • Additional embellishments of your choice


Step 1

I applied some of the tan craft paint to both sides of each chipboard piece (insert Step 1). I thought this would be a great base coat to build the pages on.

Step 1

Step 2

While the pages were drying, I went to work on the starfish chipboard pieces (these came with the mini album). I created my own texture paste by mixing together some white craft sand and Gesso. I applied it on each starfish and once it was dry, I sprayed them with the Lindy Stamp Gang sprays in the colors I selected.

Step 2 Pic 1

Step 2 Pic 2

Step 3

To create another embellishment to add to the pages, I took some fabric trim in a beach theme and cut the section I wanted to work with. I then used my distress tool and frayed the edges. Next I used another combination of Lindy’s Sprays to add some color & dimension.

Step 3 Pic 1

Step 3 Pic 2

Step 3 Pic 3


Step 4

Another fun element I created was to add some texture to the remaining starfish pieces I had left. I ran them through one of my embossing folders that had a detailed pattern.

Step 4 Pic 1

I then used more color spray to make them pop .

Step 4 Pic 2

After they were dry, I inked the edges with some Distress Ink to give them a bit of a darker edge and to add some dimension (Insert Step 4 Pic 3).

Step 4 Pic 3

Step 5

Burlap reads “beachy” to me so I knew I wanted to incorporate that into the pages as well. I cut some down to fit the chipboard piece and added more of the color sprays to give it a touch of distress .

Step 5

Step 6

I used several word stickers throughout the album so to have them stand out a bit and for added texture, I used my Scarlet Lime Doodle Pen around the edges, this really makes them pop off the page I think.

Step 6

This is where creative play comes in, my favorite part. I began adding all of the embellishments and different papers to the pages of the chipboard mini and used some Jute Twine to hold it together when I was all done. This is a fun and easy project to create that lets you show off those family fun beach photos.

Here are some photos of the completed mini album:

Final Pic 1

Final Pic 2Final Pic 3

Final Pic 4

Final Pic 5

Final Pic 7


We hope you liked this fantastic summer themed mini album. Share your summer project with us on our Facebook page.

Happy Crafting,

Crafting Ireland Team

Categories: craft | Tags: , , , ,

Card – Katya Ivanova

Hi everyone,

Today it is our Design Team member, Katya is going to  share a project with you.

You will need:

  • scrapbooking papers- 2 patterns- as we have gardening theme, try to pick papers with some sort of natural or neutral print- blues, greens, browns or beige.
  • central element- in my case the chipboard sticker
  • border punch
  • flowers
  • raffia
  • twine
  • pearls
  • flower soft
  • cheesecloth
  • glossy accents
  • sentiment stamp


Step 1

Cut out the base mats- the first measuring 13 cm and the smaller one 11.5 cm. Then I also distress the edges using Antique Linen distress ink
1
Step 2

Then I decided to use up some of the scraps and added some papers on which I used the border punch. I glued some foam squares onto the chipboard sticker
2
Step 3

Put the second layer of papers onto foam tape. Beforehand I also stitched around the sides of the square.

3

Step 4

Add a sentiment

4
Step 5

Now I start adding some embelishments- cheesecloth under the sticker, some flowers.

5
Step 6

As final touches I added some pearls, flower soft and glossy accent drops


6

This is how the final project looks like.

046

We hope you like this very cute card tutorial.

Happy Crafting,

Crafting Ireland Team


Categories: craft | Tags: , , , , , ,

Design Team Feature Time

It is that time again – design team recap! We love seeing what all our team are up to in their other crafty endeavors and love sharing their talents with all you guys. So here you are…enjoy….

Aideen – www.piecesbyaideen.com

Aideen recently was the featured crafter over on the Graphic 45 blog – you can see her full post here. She created this stunning altered tea set and storage box for them and also shows off further Graphic 45 projects she has made.

Photo 1 (2)

Did you know Aideen is not just a paper crafter – she also makes these gorgeous Swarovski hair pins. They are stunning and perfect for a bride or anyone else wanting a bit of glamour in their hair.

aideen 1

Aideen also has a YouTube channel where she posts videos of her creations and how to make them. If you have not already checked it out you need to head over and become a subscriber! A little birdie told me she is having a little giveaway too!

Abby – scrappin-abby.blogspot.ie

Abby always has gorgeous creations on her blog and these altered tins are no exception. She altered them to have some more craft room storage and they are just beautiful – who would not love storage like this in their room?….

abby 1


She also recently shared this beautiful altered vintage book. She took the book cover, altered it beautifully and turned the whole thing into a stunning mini album.

abby 2

Abby is another of our team with a very active Youtube channel where she shares video of all her creations for all the design teams she is on. She has new videos up quite regularly and is always a source of inspiration! Head over and subscribe to her channel if you have not already done so.

Andrea – sapimano.blogspot.hu

Andrea is on the Sizzix Blog design team and she makes some stunning projects for this team. This set of cards and tags she posted up recently are fabulous, we love the pops of colour against the black card stock.

andrea 1


We also loved this layout she did with a video to show the watercolour techniques used on it.

andrea 2

Andrea has a brilliant page on her blog where she lists all of her tutorials, so you can browse through them all in one place! You can find this page full of inspiration here.

Katya – madewithlovebykatya.blogspot.ie

Katya recently taught a workshop where she showed how to create this stunning travel book. If the photos are anything to go by the workshop must have been amazing!

katya 1 Katya also recently created this card for a man. She says she does not make too many of these – but we think she did an amazing job, it is perfect for a masculine card!katya 2

Katya has a Facebook page where she displays her beautiful creations and they are available for purchase also. You can see her page here.

We hope you enjoyed this look at what are team are up to when they are not posting their projects up here for you.

Happy Crafting,

The Crafting Ireland Team.
Categories: craft | Tags: ,

Hello Spring – Andrea Kovacs

Hi everyone,


Today Andrea is sharing a shabby chic home decor banner project.

What you will need:

  • Sizzix die cuts ( banner, circle, butterflies and branches )
  • craftcardstock ( white ) and cardboard
  • Scrapbook papers ( Grapphic 45 – Once upon a Springtime )
  • Mulberry flowers ( hydrangeas and roses )
  • Pearl Pen, flitters
  • chipboard letters
  • laces
  • string
  • hot glue, glue


banner 01

Step 1

Die cut the banner shapes from white cardstock and patterned paper.

banner 02

Step 2

Cut a long piece of twine and start gluing it on to the banner pieces. Try to space them out evenly.

banner 03


Step 3

Die cut small circles, these will be the background of the chipboard letters.

banner 04

Step 4

Stert layering flowers, the die cut circles, pieces of lace and the chipboard letters.

banner 05


Step 5

To embellish further add pears and sequins in coordinating colours. You can also add some diecut butterflies or branches.

banner 06


Step 6

When everything is dry, you are ready to hang up the finished piece.


banner 07

Hello tavasz banner 01

Hello tavasz banner 03
Hello tavasz banner 05

I hope you liked this very pretty spring idea. It could be easily altered to an Easter banner with die cut eggs and bunnies.


Happy Crafting,

Crafting Ireland Team

Categories: craft | Tags: , , , , ,

Pretty CD as a present – Andrea Kovacs

Hi everyone,

Today Andrea is sharing an idea on how to create a pretty presentation for a CD or DVD that you want to give as a present.

What you will need:

  • White cardstock
  • Patterned paper
  • Sizzix dies
  • Chipboard gears from Scrapfellow
  • liquid pearls

Step 1

Cut a card shape from white card stock

DSCF5001

DSCF5002

Step 2

Die cut a heart on the from of the card.

DSCF5003

DSCF5004

Step 3

Cut out a piece of double sided patterned paper and cover the inside of the card.

DSCF5006

DSCF5005

Step 4

Create a pocket on the other side of the inside of the card. This is where you will place the CD or DVD.

DSCF5015

Die cut a semi-circle on the edge of the pocket, so it is easier to pull out the CD.

DSCF5016

DSCF5017

Step 5

Add a little bit of decoration to the inside.

DSCF5018

DSCF5019

Step 6
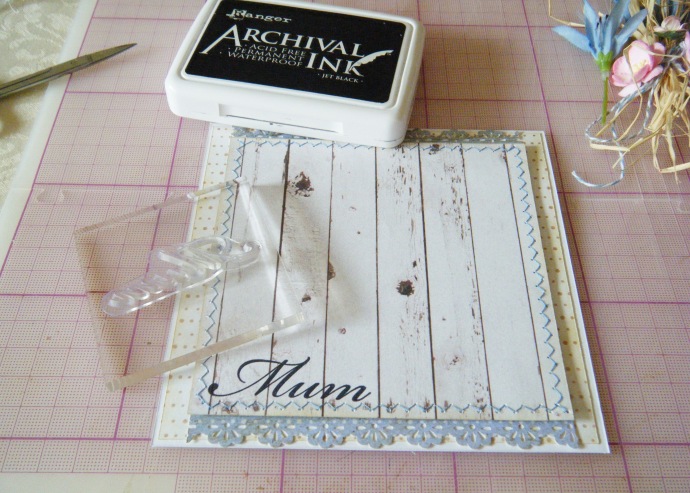
Then add decoration to the outside of the CD holder.

DSCF5007

Andrea layered some flower and chipboard gears. She also adhered some paper roses. To finish it off, she added liquid pearl dot into the centres of the flowers.

DSCF5008

Close ups:

DSCF5009

DSCF5010

This is a great idea!! You could collect your favourite songs or a DVD full of pictures and videos of your family. This would be a precious present to anybody.

Or to go even further… you could use less dimensional embellishments punch holes on the side of the card and add it to your Project Life album.

We hope you found this article inspiring.

Happy Crafting,

The Crafting Ireland Team

Categories: craft | Tags: , , , , , , ,