Posts Tagged With: waltzingmouse stamps

Halloween Card & Treat Bag

Hi all, we have another treat from Waltzingmouse Stamps DT member Sandie Dunne. She has created this really fantastic Halloween Card and Treat Bag…. enjoy!!
WMS Logo
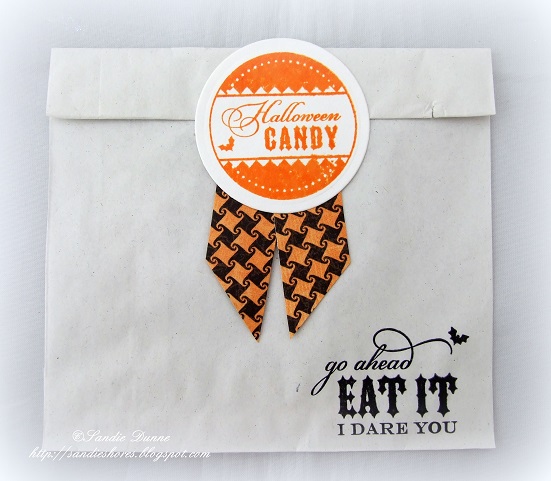
Hi! It’s Sandie here and today I am sharing a Halloween Card and Treat Bag set I made featuring  Waltzingmouse Stamps Boo and Friends & Peek a Boo Sentiments
The card measures 4.25″ x 5.5″ and the papers I’ve used are ‘Enchanted’ by Authentique. I’ve matted them with black and orange cardstock. I cut the spiderweb circle with nestabilities and mounted my ghost on 3D foam. I added some Spiderweb corners and some Eerie bats to embellish.
Copics markers used – C3, D5,C7, C9
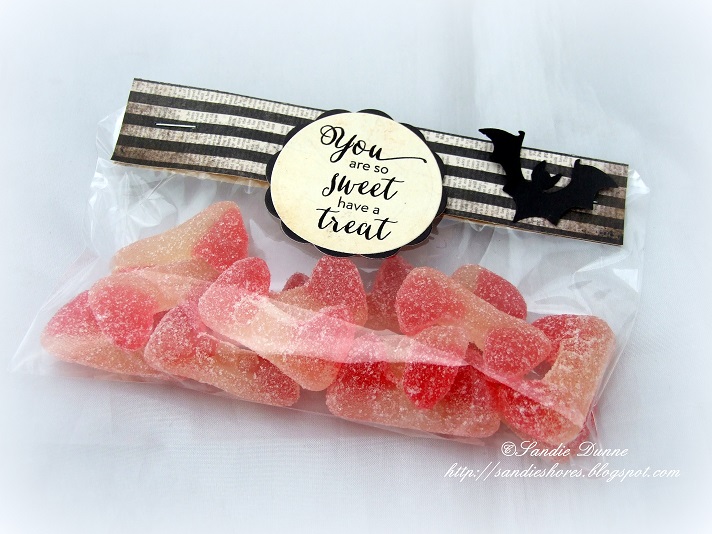
The treat bag is simply a cellophane bag cut down to size. I used the same patterned papers as on the card. I cut a strip of stripey paper about 2″ deep, folded it in half, slipped it over the top of the bag and stapled it closed. Then I used nestabilities scalloped circles and classic circles for the sentiment. I adhered the sentiment, from Peek-a-Boo Sentiments with 3D foam and added a bat to tie it in with the card.
Waltzingmouse Stamps products used – 
Other products used –
Authentique “Enchanted” 6×6 paper pad
Sandie
xXx
Categories: craft | Tags: , , , , ,

Guest Post with Sandie Dunne – Waltzingmouse Stamps

Hi all, we have another gorgeous guest post for you today, from Sandie Dunne of Waltzingmouse Stamps. She is here to show us how she created .some adorable and fun Halloween treat bags!

WMS Logo

Halloween Treat Bags

Supplies:
White paper bags – 6″ x 5″
Halloween themed patterned papers
Waltzingmouse Stamps Midnight Feast stamp set
Orange & Black ink
Midnight Feast Cut Files or Classic Circle Nestabilies
Stapler
Double sided tapeHow To: 

1. On each bag, in the bottom right hand corner, stamp the ‘Eat It’ sentiment. Set bags aside
2. Taking Peeled Orange Distress Ink stamp the circular sentiments onto white card and cut them out using Classic Circle Nestabilies, or using the coordinating Midnight Feast Cut Files
3. Cut patterned papers into 1″ wide x 3.5″ long strips and scissor cut the bottom at an angle to make pennants. Staple 2 pennants together, at the top, and adhere to the back of the circular sentiment

4. Once you have your candy/treats in the bag, twice fold the top down about 1″. Remove the backing from the double sided tape and adhere the bag closed.
 We love these adorable treat bags that Sandie has made. They would be great for parties or even for giving out at the door – depending on how many visitors you get that is!
Categories: craft | Tags: , , , , ,

Masculine Birthday Card – Nicole Mullen

Hi all,

It was recently my dads birthday so I wanted to make a great masculine card for him. I used the back in the saddle stamp set from Waltzingmouse Stamps for this one.

Step 1

I stamped out the mini wanted poster from the set.

pic 1 aa

Step 2

I masked off the edges using post it notes and stamped the horse and rider from the set into the image.pic 1a pic 1Step 3

I used a stencil to add some interest to the edges of my background paper.pic 2 Step 4

I tore a strip of kraft paper to mount onto my background paper.pic 3 Step 5

I cut out my wanted poster and had a look to see how it was all coming together. It was all still much too bare so….pic 4 Step 6

I stamped a crackle stamp on the kraft paper.pic 5 Step 7

I added a sentiment on a tag and some cog chipboard too. I stuck the mini wanted poster down on foam pads for more dimension.pic 6 Step 8

I added twine to the tag and also along the left side of the card.pic 7 pic 8 Step 9

My final embellishment was some empty bullet cases from a trip to the gun range with my dad!

pic 9


And here it is complete….

pic 10

I am happy to say he loved it too! Thanks for stopping by today, I hope this helped you with those masculine cards we tend to struggle with.

Categories: craft | Tags: , , ,

Guest Post with Sandie Dunne – Waltzingmouse Stamps

Hi all, we have another gorgeous guest post for you today, from Sandie Dunne of Waltzingmouse Stamps. She is here to show us how she created a fun beach scene using the My Island stamp set.

WMS Logo

Supplies
Stamps: Waltzingmouse Stamps My Island
Distress Inks – Frayed Burlap, Mustard Seed & Spiced Marmalade
Black Ink
Patterned Papers
Cardstock
Embellishments – Seashells & Fishing Net
3D foam dots
To create your scene first stamp out the background with Mustard Seed
Then stamp the sunset with Spiced Marmalade on top
And finally add your palm tree island with black ink.
I created a shadow on the palm trees by offsetting with Frayed Burlap distress ink.
Design your card base deciding where you want to place your image. Cut a piece of fish net a little larger than your image and adhered into place with hot glue.
Because the fish net is quite thick you will need to double up on 3D foam dots.
Adhere your image onto the card front. I added a little more fishnet offcuts to the left of the image.
Stamp the sentiment onto a piece of coordinating card and rip across the bottom. Adhere it just slightly under the image. Finally, hot glue some seashells around the card.
This set contains many more elements for creating scenes. It would also be ideal for scrapbooking your vacations, family BBQs, creating invitations and other greeting cards. You can also avail of the My Island cut files, which you can find HERE
Thanks for looking!
Sandie
Categories: craft | Tags: , , , , ,

Guest Post with Sandie Dunne – Waltzingmouse Stamps

Hi all, we have another gorgeous guest post for you today, from Sandie Dunne of Waltzingmouse Stamps. She is here to share the process of creating a beautiful layered card. Working with layers can be intimidating to some, so check this out!!

WMS Logo

Adding lots of layers to your cards can give it a rich, luxurious feel. You can also have many surprise elements like pull out tags and gift card envelopes to make your card that little bit extra special.
Supplies –
WMS Cutting Edge Dies – Stitched Tags
Kaisercraft Porcelain Rose 6.5″ x 6.5″ paper pad
White & Pink Cardstock
Red & Green distress  ink
Black Ink
My card base is 147mm x 294mm folded in half.
I cut the layers at:
 Bottom Panel  – Pink Cardstock – 143mm x 143mm, Patterned paper 140mm x 140mm
Top Panel – Pink cardstock – 120mm x 120mm, White Cardstock – 117mm x 117mm, Patterned Paper 114mm x 114mm
Set to one side
Taking Black ink stamp out the packet seed onto white cardstock
Ink the Strawberry from Vintage Garden – Produce and stamp it onto a scratch piece of paper, then restamp into the middle of the packet seed. Twice stamping gives it a more distressed look.
Stamp the sentiment from Vintage Garden – Packet Seed, in black ink, across the Strawberry
Using your scissors, cut around the outline, leaving a little bit of white outside the line.
Taking the Stitched Tags Die cut out numerous tags of different sizes, in coordinating patterned paper. Also, cut some doilies in half.
Layer some of the doilies between the bottom and top panels, on each side. The layer more doilies and the tags behind the Packet Seed. Add twine/ribbon through the top of some tags  – you can also add flower/buttons.
Embellish the card with more die cut flowers and add some pearls/liquid pearls to the centre of each one. Finish the card by adding some white pearls.
Sandie
xXx
Categories: craft | Tags: , , ,

Guest Post – Waltzingmouse Stamps

Hi all, we have another gorgeous guest post for you today, from Sandie Dunne of Waltzingmouse Stamps. She is here to share a clever project idea with us.

WMS Logo

Using stamps with computer generated text is an ideal way to personalise your cards. It’s quick and simple to do and it adds that little extra touch to make it special.
Supplies used on my card: 
Dies – Heart Border, Heart & Key, Heart Corner, Lotus, Pretty Poinsettia & Honeycomb
Embellishments – Buttons, Floss/Twine & Pearls
Open MS Word and a new blank document. Click on Insert -> Text Box -> Simple Text Box.
Measure the die you will be using to cut out your sentiment – in my case this was the Labels 25 Nestabilites and it was 3″ in height x 4.75″ in width. Set the size of the text box to match. Doing this gives you an idea of how large/small you want your font.
Type your text and position it where it needs to be.
Remove the outline from the Text Box.
Print your page.
Taking the stamp, hover over the text until you are happy with the position and then press it down.
Cut out using your die of choice.
Assemble your card and give to the happy couple!
We love this clever technique from Sandie, its a beautiful way of personalising a handmade card even further!
Categories: craft | Tags: , , , , ,

Guest Post – Waltzingmouse Stamps

Hi all, we have another gorgeous guest post for you today, from Sandie Dunne of Waltzingmouse Stamps. She is here to share a gorgeous thank you card project with us.

WMS Logo


Supply List: 
Waltzingmouse Stamps – Vintage Garden Seed Packet
White & Wine Cardstock
Brick wall Embossing Folder
Distress Markers
Foam Dots or Tape
Staz-On or Archival Ink (Black)
Fold the wine cardstock in half on the long side and cut in two, to make two card bases of 105mm wide x 248mm long. You will only need one base.
Cut a piece of white card at 100mm x 243mm and emboss with the Brick Wall folder
On watercolour card, stamp out the flower from Vintage Garden – Packet Seed with either Staz-On or Archival black ink. Colour it up with distress markers, then fussy cut it leaving a little white border all around.
Adhere the flower to the card front with 3D foam and stamp out the sentiment carefully, pressing down firmly to ensure even coverage over the embossed bricks. Then adhere the whole panel to the card base with foam tape, for extra dimension.
Hope it inspires,
Sandie
Categories: craft | Tags: , , ,

Guest Post – Waltzingmouse Stamps

all, we have another gorgeous guest post for you today, from Sandie Dunne of Waltzingmouse Stamps. She is here to share a fabulous up-cycled project with us.

WMS Logo

Supplies: 
Gift Box
Patterned Papers
Distress Ink & Sponge dauber
Embellishments of choice
Measure the top and sides of the box and cut out some patterned papers about 1/8″ smaller (so if the box measured 6″ x 8.5″ you would then cut paper at 5 7/8″ x 8 3/8″). Also cut some extra panels for layering. Ink the edges of the papers if desired and adhere them to the box with a strong double sided tape. Layer up the extra papers.
Taking the Gift Card Envelope die, cut out an envelope from double sided patterned paper. Also cut out 3 ‘cards’ using the Gift Card Set. For one of the cards I used a sticker adhered to paper and then cut out with the gift card die
Fold the envelope on the score lines and then adhere the edges with 1/8″ DS tape.
Adhere some ribbon to the back, enough to tie around the front and into a bow.
Taking the Gift Card It stamp set, add sentiments to the cards. Stamp sentiment along the bottom of the envelope.
Stamp the baby shoes from Nordic Baby onto patterned paper and trim them out with a scissors.
Arrange all of the elements onto the top of the box until you are happy with them, then adhere everything down. Insert the 3 gift cards into the envelope and tie it closed with the ribbon.
Categories: craft | Tags: , , ,

Guest Post – Waltzingmouse Stamps

Hi all, we have another gorgeous guest post for you today, from Sandie Dunne of Waltzingmouse Stamps. She is here to share a gorgeous spring scene card with us.

Giveaway!!

Oh and big hint….make sure to read all the way to the end to see the fabulous GIVEAWAY hidden in this post!!

WMS Logo

Good morning! Today I have a quick and easy Spring themed card to share with you.
This card showcases Spring Baskets from Waltzingmouse Stamps – a wonderful set which not only covers Spring but also incorporates Easter and Mother’s Day.
Supplies: 
Staz On Ink (if you are using watercolours)
Distress Markers
Distress Inks – Shabby Shutters & Tumbled Glass
Watercolour paper
Spring coloured papers & cardstock
Stamp a scene, using various stamps from the Spring Baskets set, onto watercolour paper with Staz-On ink. If you wish to colour with alcohol markers you should use Memento ink.
Once you are happy with your scene, colour it in and trim the panel to size.
Taking Shabby Shutters and Tumbled Glass, sponge the background to create a ‘sky’ and ‘grass’
Create a border around the edges, about .25″ from all sides.
Make the card base and cut all your papers/card to size.
Layer up the papers & card adding the scene panel with 3D foam tape or dots. Embellish as desired. I simply cut a pennant and 2 ‘washi’ strips from the patterned paper and added a button flossed with baker’s twine.
If you’re feeling more adventurous you can find the WMS Spring Baskets template HERE – perfect for using this stamp set with.  For more Waltzingmouse Stamps inspiration why not visit the Pinterest Board, or pop onto the Forum & Gallery.
Sandie
xXx
***********************************************

Giveaway!!

To brighten up someone’s day, while we await those first signs that Spring is finally here, we are going to have a little giveaway. One lucky commenter will win the Spring Baskets stamp set used on today’s project.
Here’s what you have to do.
* Leave a comment here telling us what your very favourite Waltzingmouse Stamps product is.
* Hop over to the Waltzingmouse Stamps Blog and leave a comment on the tutorial post.
That’s it! Easy peasy.
We will pick a winner on Thursday, February 26th.
Categories: craft | Tags: , , ,

Guest Post: Valentines Card by Waltzingmouse Stamps

We have another guest post from Waltzingmouse Stamps  today by the wonderful Sandie Dunne….enjoy!WMS Logo
Hi, it’s Sandie here with another quick and easy tutorial. This month I am making a Valentine card featuring Woodgrain and My Heart stamp sets from Waltzingmouse Stamps.
Supplies:
  • Stamps: Woodgrain & My Heart
  • Plain White Card 250gsm
  • Standard Circle Nestabilities LG
  • Red & Black Ink
  • Ribbon, Baker’s Twine & Charm
Fold the white card and make a card base 120mm x 210mm. Cut a front panel 115mm x 205mm. Taking the 2.75″ circle die cut out a circle slightly off centre towards the bottom right of the front panel.
Position the front panel on top of the card base – do NOT adhere it at this point – and stamp the heart from the My Heart stamp set with red ink in the centre of the circle. Set the card base aside.
Taking the front panel, stamp the chevron border with red ink across the top.
Then, using black ink, stamp the sentiment, which is made with two stamps from My Heart.
Finally, add some ribbon, and a bow just under the chevron border.
Adhered the front panel to the card base with 3D tape or dots, positioning the circle over the stamped heart.
Add some baker’s twine through the loop of the heart charm and adhere to the right hand side of the stamped heart with a strong wet glue.
Stamp a sentiment inside, or add an insert to finish the card.
********************************
We hope you enjoyed this tutorial from Sandie. It is such a gorgeous card and very easy to replicate or adapt with any other stamps you have!
Categories: craft | Tags: , , , , , , ,